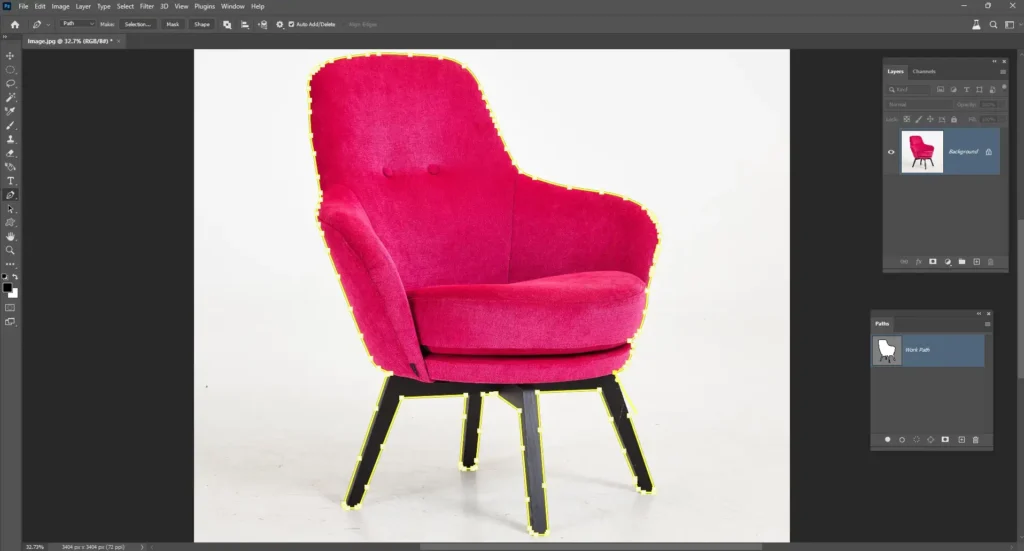
Our tips on how do I create a clipping path in Photoshop are great for everyone, from beginners to experts. In this blog post, we will give you simple guidelines that help you become an advanced photo editor quickly.
Step-by-Step Guide to Creating a Clipping Path in Photoshop
Our step-by-step guide gives you precise control over what you want to learn. Learning this skill is important for designers, photographers, and anyone who edits complex images in Photoshop.
Step 1 – Open your image in Photoshop:
Once your workspace is ready, open the image you want to edit in Photoshop. Navigate to File > Open, and choose the image that you want to detailed work.

Step 2 – Select the pen tool:
The Pen Tool is an essential and one of the best tools for creating pixel-perfect clipping paths in Photoshop. If you are new, take the time to understand its key features and how to use it.
- Anchor Points: These are the points where the path bends or changes direction according to the edges of the image.
- Curves: By dragging and drawing anchor points, you can create smooth curves and soft or hard corners by following the outline of the object.

Step 3 – Start Creating Your First Point:
To start, click a straight spot on the edge of your subject to create an anchor point. Continue clicking to add more points along the edges of the image. For curves and corner edges, adjust the curvature with the arrows on either side.

Drawing the paths closer together in complex areas to keep everything accurate.
Step 4 – Closing the Path in the First Point:
Once you’ve traced around the object edges, return to your starting point and click on it to close the path. After that, you can be sure that your clipping path is working properly

Step 5 – Saving your work:
After closing the anchor points, rename your path in the Paths panel. This will help you stay organized while working on multiple clipping paths for your project.

Step 6 – Make Selection
To make the selection, right-click on your required path and select “Make Selection” in the paths panel. This step helps to remove the background from an image.

Step 7 – Creating a Layer Mask
Once your path is selected, apply a layer mask by clicking the Add Layer Mask button in the Layers panel. This will hide the background from the subject in your graphic design project.

Step 8 – Apply feather
If your edges look too harsh, use the Feather option to soften them slightly. You can use a 0.2 or 0.3 feather value in the dialog box to make the edges smooth.

Step 9 – Saving the Image
When you finish your work, save the images in JPEG format by pressing Ctrl + S. You can also choose to save the path in PSD, TIFF, or PNG formats if needed.


Quick Methods to Create Paths in Photoshop
Here are some fast and effective techniques to cut out images in Adobe Photoshop.
Magnetic Lasso Tool:
- Trace the edges: Click and drag the Magnetic Lasso tool along the object edges. This tool automatically snaps to the opposite end.
- Close the path: Click on the starting point to close the loop.
- Convert to the path: Right-click and convert “Work Path” to a path.

Quick Selection Tool:
- Select the object: Use the Quick Selection tool to roughly select the object. Refine the selection using the Refine Edge tool if needed.
- Create a layer mask: Right-click on the selected layer and choose “Create Layer Mask.” The layer mask will automatically create a clipping path based on the selection.

Common mistakes to avoid when you create a clipping path in Photoshop
- Over Anchor Points: Having too many anchor points can make your path look uneven. Use fewer points and smooth out the curves as needed.
- Zooming: Working too far out can lead to imprecise paths. Always zoom in closely for detailed areas.
Tips for Creating a Pixel-Perfect Result
- Patience: Take your time placing anchor points carefully, especially around curves and fine details.
- Zoom Level: Zoom in on the object to create a clearer path. This helps you place anchor points more accurately. Try to use a zoom level of 300-400% to get the best results.
- Path Adjustment: You can always adjust your anchor points by holding down Ctrl/Cmd and clicking on the point you want to move. You can correct the path where needed.
- Shortcut Keys: Learn shortcut keys like Ctrl + Z for undo, Ctrl+Space for move, and Ctrl + + to zoom in, making your workflow faster.
Different Types of Photoshop Clipping Paths
A clipping path is a line that outlines the shape of an image. It helps to separate parts of an image for different uses. You can remove backgrounds, change colors, or add effects. Here are some common types of Photoshop Clipping Paths.
Basic Image Cut Out
A basic path shows a single object or shape without any complex details or holes. This is for simple products with straight or slightly curved edges, such as boxes, books, or cups.

Complex Image Editing
A path shows the details of objects like hair, fur, or fine lines. For more detailed items like jewelry, flowers, or machines. This process uses many anchor points, curves, and times.

Compound Photoshop Clipping Path
You use a compound clipping path when you need multiple paths for many holes or corners. For example, it helps separate different parts of an object, like the holes in a chair.

Multiple Clipping Paths In Photoshop
Photographers mainly use this in fashion photography to separate dresses in model photoshoots for e-commerce. For complex images with many objects, make a separate clipping path for each object. Place each one on a different layer.

Conclusion
Learning the clipping path in Photoshop is a useful skill for anyone who wants to make clean, professional images.
I hope these guides will help you learn how do I create a clipping path in Photoshop that enhances your work. With practice more and more, you’ll work faster and produce better results.
FAQs
What is the best method to create a clipping path in Photoshop?
Using the Pen Tool with practice is the fastest and best way to create high-quality work.
Can I use other tools in Photoshop to achieve professional results?
The Pen Tool is the most precise option. You can use the Magic Wand or Quick Selection tools, but it won’t be a professional result.
How do I refine my work for complex objects like hair or fur?
For complex edges, consider using Select and Mask Or Photo Masking Technique instead of a clipping mask.
Can I edit a saved clipping path?
Yes, you can always return to your saved paths and make adjustments using the Pen Tool.


