Photoshop is a powerful tool graphic designers, photographers, and artists use worldwide. One of the most essential features of this software is the Pen Tool. The Pen Tool allows users to create precise shapes and paths for their design projects. However, mastering the Photoshop Pen Tool can be challenging for beginners.
We will walk you through everything you need to know about Photoshop software and Pen Tool. It will give step-by-step guidance on using this tool. It will help you cover essential functions well in advanced techniques in Photoshop.
Introduction of Photoshop Software:
Photoshop is a powerful image editing and cropping software developed by Adobe Systems Inc. Digital image editing, retouching, and manipulation are widely used by professionals such as photographers, graphic designers, web designers, and video editors. It has an intuitional user interface that allows users to learn and use the program’s features quickly.
Photoshop has many tools and features, including selections, layers, brushes, filters, layer styles, effects, and more. It can be used to create stunning images, designs, and illustrations and to retouch, enhance, and manipulate photos. Photoshop is also used for photo restoration, digital painting, and 3D modeling.
Understanding the Pen Tool Basics
The Photoshop Pen Tool is powerful and can help you create detailed and intricate designs. It is an essential tool for graphic designers, artists, and photographers. It allows them to create vector shapes, paths, and masks quickly.
Mastering the basics of the pen tool can seem intimidating. However, this can take your design skills to the next level. This article will explore the basic capabilities of the Photoshop Pen Tool. This will help you understand how it works and use it with confidence.
We’ll explore the different modes of this fantastic tool. We’ll learn how to use each one effectively for different design needs. Lastly, we’ll provide some tips on how to get started. So, let’s get started!
What is the Photoshop Pen Tool?
Pen Tool is a powerful tool in Photoshop Software. It is a vector-based drawing tool. It is used for creating and editing shapes and paths in Adobe Photoshop. It is designed to provide precise control over paths and shapes, allowing you to create highly detailed and intricate designs.
The Pen Tool can create paths that can be used for selections, masks, and even for drawing illustrations.
It can be used to create and edit paths, as well as to create and edit shapes of objects. The Pen Tool enables you to edit the form of paths and shapes. This makes it simpler to generate intricate shapes and paths in no time.
Types of pen tools, anchor points, and handles:
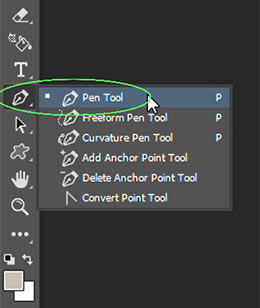
There are five types of pen tools: –
- Photoshop Pen Tool
- Freeform Pen Tool
- Add Anchor Point Tool
- Delete Anchor Point Tool
- Convert Anchor Point Tool
The Freeform Pen Tool allows users to draw curved and straight lines that are connected by anchor points. Anchor points are points on a path that defines the shape and allow users to manipulate the path. Handles are the lines that come off of the anchor points and allow users to adjust the paths.
The Add Anchor Point Tool adds an anchor point to an existing path. The Delete Anchor Point Tool removes an anchor point from an existing path. The Convert Anchor Point Tool converts a smooth point into a corner point or a corner point into a smooth point.
The difference between curves and corners
The main difference between curves and corners is the shape they create. Curves are smooth and gradual. They form an arc in a line. Corners are sharp angles created by two straight-line segments meeting at one point.
Curves create soft shapes and edges. Corners create stark, defined edges and shapes.
Architecture and design often involve curved shapes. These shapes create a sense of movement and flow. In contrast, corners create more solid and defined shapes. Curves can also be used to create visual interest, while corners can create a more uniform, orderly appearance.
The Pen Tool vs. other selection tools
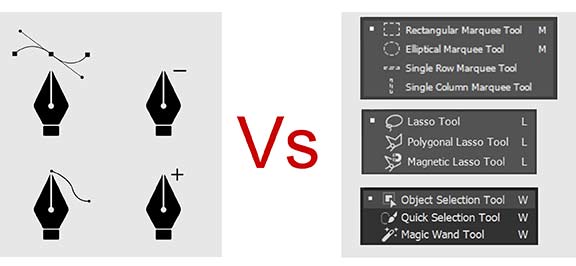
The Pen Tool is a powerful selection tool used in graphics and image editing applications. It allows users to create precise selections and paths, which can be used to create shapes of objects. The Pen Tool offers more control and accuracy than other selection tools. These include the Magic Wand, the Lasso Tool, and the Quick Selection Tools. The Pen Tool allows users to create both curved and straight lines. It also enables them to make complex shapes.
All they need to do is click and drag points. In addition, the Pen Tool allows users to easily adjust paths by adding and deleting points and adjusting curves. This makes it ideal for creating intricate designs, logos, and other artwork.
How to use the Pen Tool in Photoshop to create a path
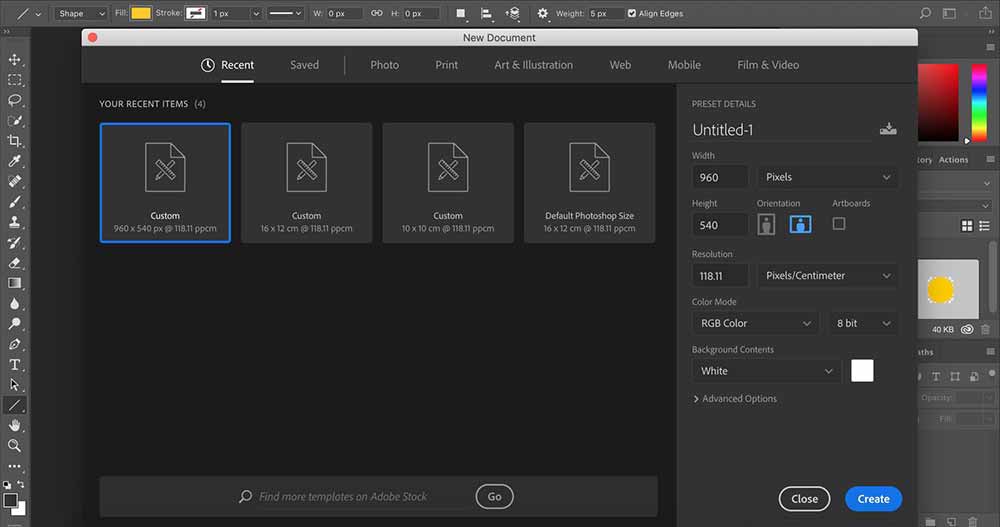
Select the image you want to work with. Then use the pen tool to create a clipping path. Once you have selected the image, follow these steps:
- Open your image in Adobe Photoshop which you want to create paths.
- Select the pen tool from the toolbar. The pen tool looks like a fountain pen tip in the toolbar.
- Use the pen tool to draw a path around the subject that you want to extract from the background. Click on the edges of the subject to create anchor points. You can use the handles on the anchor points to adjust the curve of the path.
- Once you have drawn the path around the subject, close the path by clicking on the first anchor point. You will see that the path has become a closed vector shape.
- With the path still selected, go to the “Paths” panel and click on the “Make Clipping Path” button. This will create a clipping path based on the path that you have drawn.
- Save the image as a JPG or PNG file format to preserve the transparency of the clipping path.
Editing a path of pen tool
Editing a clipping path with the pen tool may seem daunting. However, the right techniques can make the process simple and efficient. Begin by selecting the pen tool and drawing around the object to be clipped. Edit the clipping path by using the direct selection tool.
Alternately, press “A” on the keyboard to select individual anchor points. Then, move them as desired. To add anchor points, click and drag outwards from an existing point. It is possible to adjust curves. Select the anchor point where two curves meet. Hold down “Option/Alt” while dragging outwards.
Filling and Stroking a Clipping Path
Clipping paths are used to isolate objects from their backgrounds to manipulate them individually. Filling the clipped area with color or pattern and stroking its edge can add visual interest. To fill a clipping path, you can use a paint bucket tool, adjust your brush size, or use a gradient tool.
After filling, you can stroke the edge with a solid line or custom brush strokes for emphasis. Clipping paths are an important tool in graphic design. Filling and stroking them can have a big impact on the final artwork.
Advanced Pen Tool Techniques
Working with complex shapes
Photoshop offers a range of tools to enhance complex shapes, the most beneficial of which is the Pen tool. This tool is quite versatile, allowing users to adjust the size, direction, type of stroke, color, opacity, and more.
Maximize this tool’s utility by selecting a Brush Preset. Apply the same brush to draw the shape’s outline. Apply the same brush to draw the shape’s interior.
Drawing with the Freeform Pen Tool
You can also adjust the width of your lines by dragging the Weight Slider in the top toolbar. You can also change the color of your lines by selecting the color from the Color Panel. With the Freeform Pen Tool, you can easily create intricate and unique shapes for your artwork.
Drawing with the Magnetic Pen Tool
You can also adjust the settings of the tool to fine-tune the shape and make it look perfect. The Magnetic Pen Tool is ideal for creating precise shapes, logos, and other artwork that requires precise measurements and curves. Additionally, it can be used to quickly draw out paths and select elements in an image.
Drawing with the Curvature Pen Tool
You can also adjust the points to make your designs stand out. You can also use the tool to draw straight lines and make precise adjustments to the points. The Curvature Pen Tool is a powerful tool for any artist. It is ideal for creating illustrations, logos, and web graphics.
Tips and Tricks for Using the Pen Tool In Photoshop
Using keyboard shortcuts
Using keyboard shortcuts for the pen tool can make editing easier and faster. To access the pen tool, press the keyboard shortcut P. This will bring up the pen tool, as well as all of its associated options. With the pen tool active, you can then use the keyboard shortcuts to select and adjust various options.
Press + to increase the size of the pen tool’s brush. Press – to decrease the size of the pen tool’s brush. These are useful keyboard shortcuts. With these shortcuts, you can quickly and easily make adjustments to the paths of your artwork.
Snapping and alignment options
Snapping and alignment options for pen tool allow users to easily draw precise shapes and paths. Snapping is a feature that helps you draw with accuracy and precision. It makes the pen tool snap to other points, objects, and paths in the workspace. This helps you create straight lines, curves, and other shapes with ease.
Saving and loading custom paths
Saving and loading custom paths is a feature found in many programs and applications. It enables users to save a set of paths or routes they have created. This allows them to quickly access them in the future. Navigating complex data structures, such as those found in graphics or game programs, can be difficult.
This is where this technique is especially useful. It can also help when setting up complicated series of commands or tasks.
Saving custom paths can be done in two ways. First, manually entering the paths. Second, using a dedicated program or feature within the program, depending on its capabilities. Similarly, loading custom paths can also be done in the same ways.
Once the paths are saved, they can be quickly accessed for later use, making it easy to repeat complex tasks without having to recreate the paths from scratch each time.
Troubleshooting common problems
The most common problem with custom paths is that some of the information is not being transferred correctly. In the above example, you can see that the “b” was sent correctly, but the “c” was not. This means that your script needs to be edited, or possibly even completely redone.
The most common cause of this is that you have added something to the file name. If the file name has changed, the path will fail to load properly.
Another common issue with custom paths is that the file name is too long. Depending on the application, a file path might be limited to 10 characters. It would therefore be wise to check the custom paths that you have set.
Combining the Pen Tool with Other Tools and Features
Using the Shape Tools with the Pen Tool
The Shape Tools and the Pen Tool are two useful tools for creating vector graphics in Adobe Illustrator. The Shape Tools are a set of basic shapes, such as squares, circles, polygons, and stars, that can be used to quickly create graphics. These shapes can then be customized using the Pen Tool to edit their shape, size, and position.
To use the Pen Tool, select it from the Tools palette and click and drag the points on the shape to modify its shape. You can also add new points to the shape to create curves or points. You can also customize the color, stroke, and line style of the shape by going to the Stroke palette. The Pen Tool is also great for creating paths, which are used to create more complex shapes and designs.
To create a path, select the Pen Tool and click and drag the points on the path to modify the shape. You can also add new points to the path to create curves or points. Once you have the desired shape, you can customize the color, stroke, and line style of the path by going to the Stroke palette.
Using the Pen Tool with the Clone Stamp Tool
The Pen Tool and the Clone Stamp Tool are both powerful tools available within Adobe Photoshop and other graphics software. It can be used to create and edit vector shapes and paths, while the Clone Stamp used to clone portions of an image. Making it easy to correct mistakes or duplicate sections of an image.
Using the Pen Tool with Layer Masks
Using the Pen Tool with Layer Masks is a great way to edit images in Adobe Photoshop. It allows you to create precise and intricate selections in an image. Then use those selections to create a layer mask. You can hide or reveal parts of a layer, giving you full control over which parts of the image are visible.
To use the Pen Tool with Layer Masks, simply select the Pen Tool from the toolbar. Then click and drag your cursor around the area of the image that you wish to select. Once the selection is complete, click on the Layer Mask icon in the Layers panel. You can then use the brush tools to paint onto the layer mask, revealing or hiding parts of the layer.
This is a great way to make complex edits to your images without permanently erasing parts of them.